
Starting the "N"
Jan 14 Over the past couple of days, I've put a little effort into getting the tractor running. Not so much that I've attempted to start it, but doing a few things that need to be taken care of before I actually try to fire it up.
Saturday, I removed the four spark plugs after cleaning the area around each in the cylinder head and blowing out the rust and debris with compressed air. Once they were out, I inspected each plug (they looked pretty good, but the bases were fairly rusted), and then put ¼ ounce of oil in each cylinder to lubricate the pistons. For some reason, I've always been told that "Marvel Mystery Oil" was the proper lubricant for doing this, and since I happen to have a container of the same left over from working on the Housetruck, I applied that product. Getting it into the cylinders was a bit of a job, as there isn't much room between the top of the cylinder head and the metal tube that the spark plug wiring runs through. It took many squeezes of an eyedropper bulb to get even the ¼ oz. transferred from a measuring glass.
Yesterday, I repeated the treatment, and while I was on the phone with TMAX (just because he called when I was getting ready), I used a pipe wrench on the hydraulic pump drive shaft to turn the engine over. Success! It wasn't seized up!
After about a half turn of the crankshaft, I realized that the tractor was in gear, and attempting to back over the 4x4 blocks that were behind the rear tires.This put torque on the drive system, and prevented me from turning the crankshaft much farther. This was actually a bonus, as it allowed me to get up on the tractor and step on the clutch. Releasing the clutch relieved the torque build-up and allowed the tractor to roll off the blocks, and it also allowed me to take the tractor out of gear. The value in all of this is that I now know that the clutch disc is not frozen to the flywheel and/or pressure plate, which is a common problem on most any manual transmission vehicle when it has sat for an extended period.
Before the day ended, I wire brushed the plugs before reinserting them.
Today, I decided to put some time into getting ready to crank the engine. The first thing I wanted to do was to remove the front-mounted hydraulic pump, because I don't know what condition the hydraulic system is in. If the system is dry (fluid leaked away from all the rusted components), I didn't want to run the hydraulic vane pump dry. If there is actually hydraulic oil in the pump, I was worried that cranking the engine (and turning the pump) might cause fluid to escape through the rusted parts, possibly spraying me and/or creating a hazardous waste problem in the yard. Taking the pump off wasn't too difficult, although rusty, the bolts and nuts came loose, and I was able to remove the pump drive shaft from the front pulley of the engine.
These old tractors use a 6-volt electrical system. While many owners have modernized the electrical wiring to be 12 volts, there are just as many "purists" who will tell you to leave the wiring 6-volts unless you have some reason to change it over.
Actually, I was aiming for something in the middle, 8-volts. Going to a four-cell battery was an old trick to improve the performance of 6-volt vehicles. The additional voltage wasn't enough to warrant changing a lot of the accessories (lights, radio, gauges, etc), and most 6-volt generators could be coaxed into putting out the extra charging current and voltage needed by adjusting the regulator. The main reason for the higher voltage is brighter headlights (not an issue on a tractor) ~and~ faster starter motor operation, which is always welcome when trying to start on a cold morning.
Part of the reason that I was going 8-volts was that I had an Optma brand "blue top" battery that had one bad cell, and I wanted to use it for something. I spent too much time calculating the location of the internal buss bars that interconnect the cells in the battery, drilling a precisely located hole in the top cover and installing a screw-in lead terminal. It was all very grand, but the eventual fact was that the battery had more than one dead cell, and when I tried to crank the tractor the terminal voltage fell to 2 volts, not enough to be useful.
Back to the drawing board, or more correctly, the garage, where I had a couple of salvaged-and-believed-good 12-volt marine "deep cycle" batteries. One of these was installed under the hood of the tractor and connected with cables that had the connecting terminals cleaned up to bright metal. With the spark plugs out of the cylinders to relieve compression and the rest of the tractor's electrical system isolated (disconnected) , I used a clip-lead to energize the starter solenoid.
Wow! It cranks! I was concerned that the exterior appearance of the starter might mean that it was as crusty and corroded inside as it was out, but apparently it still has some life left. After about 15 seconds, there was a puff of smoke from the solenoid, and I pulled the clip lead loose just as the oil pressure gauge began to rise. The connection between the battery cable and the solenoid was not very good, and it was heating up. A few minutes with a wire brush, and some new, not-rusty bronze washers and it was back in business. I was able to run the starter for 15-20 seconds at a time and not cause the terminals to heat up. There was a reassuring whooshing sound coming from under the hood, as the pistons traveled up and down.
So, What do I know now that I didn't before?
- The engine isn't locked up
- It appears to have compression, although this may be a matter for further investigation
- The starter and solenoid work
- It has oil pressure (10 pounds while cranking is good!)
- The clutch appears to work, or is at least not stuck
- The engine turns clockwise, looking from the front of the tractor
That last is a bit of a surprise. I am certain that I read somewhere that this engine turns counter-clockwise, but that is apparently bad information.
So, I think that next up will be seeing if there is any spark. It's not at all unusual to have the ignition points become corroded when an engine sits. Without a spark, there's no reason to try and introduce fuel, so that's really the next logical step. The distributor is buried under everything at the front of the engine, and the stupid front loader framework makes it that much more difficult to get to. Fortunately, I have lots of time to fool with it, and the blessing of some dry and sunny weather, albeit colder than I'd prefer.
More as it comes in...
Jan 17 After posting the above, I got a message from Dave, a long-time viewer of the site reminding me that these tractors use a positive-grounded electrical system, as opposed to the much more common negative-grounded system that most vehicles in the U.S. employ. I'll copy-and-paste my reply to Dave here, as it contains some additional factoids that are relevant to the tractor's progress:
| Sharkey wrote: |
|---|
| I was aware that the N was positive ground, and that's how the battery is installed.
The rotation of the starter motor is not affected by the polarity of the battery because it's a series wound field motor, it runs the same direction regardless of polarity. Changing these tractors over to negative ground is done all the time without replacement of the starter motor. The engine wouldn't turn backwards in any event, as the Bendix drive would prevent engagement of the flywheel if the rotation was backwards. If the starter was permanent magnet, the rotation would be dependent on polarity, and that would be a problem. I will be keeping the tractor positive ground, but for a different reason - the ignition coil. I remember reading (probably in a 1950's Popular science magazine when I was a kid) that although an ignition coil will work when connected backwards, the spark is jumping in the opposite direction on the spark plugs, and this causes some issues, either spark intensity or wear on the electrodes. Since the ignition coil on the N is integral with the distributor, it's not possible to simply swap the ignition coil for a negative grounded one. Right now, I'm not looking for additional projects, or to throw a wild card into the equation, so positive ground stays until I have to replace the coil. Some N users have hollowed out the stock front-mount coil and put a high tension connector on the outside so that an external round automotive coil can be used. If I ever have to go this route, I may consider changing the tractor's polarity. If I have to replace the generator, I have an alternator that has a rear-mounted hydraulic pump (power steering). I may use this so I can convert the tractor to a live PTO. This would require negative ground conversion and some change to the coil. Right now, getting the correct ballast resistor so the stock coil doesn't draw too much current at 12 volts and burn out is my bigger concern. |
OK, so a couple of days ago, I began investigating the ignition system on the N. First off, I put an ammeter in series with the ignition coil's primary lead and cranked the engine. Nothing, not a dickey bird. The means that either the coil was open, or, more likely, that the points were corroded, as I expected previously.
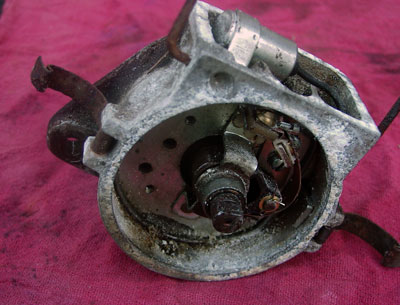
The distributor on this engine is front-mounted. Not "mounted at the front", but mounted ON the front of the engine. It's impossible to do anything with the distributor without removing it from the engine. Normally, this is the very last thing you would want to do on an engine, as removing the distributor upsets the engine ignition timing and also means that replacing the distributor is a royal PITA because it usually drives the oil pump -and- has helical gears that engage the cam shaft in the engine, which means that is doesn't just come off, it rotates when it withdraws. Overall, removing a distributor is considered a last-choice option. If working on the points means contorting your body inside the engine compartment, then that's what you do for a long as it takes the get the job done, because removing and replacing the distributor is so much of a job and then the engine has to be re-timed.
The designers of the N were either simple-minded, incredibly generous, or knew that all-thumbs farmers would be having to work on these tractors, so they made the process of removing the replacing the distributor much, much easier. Yes, the distributor must come off for all service, but it only goes back on ONE WAY, the way it come off (automotive distributors can be reinstalled in a huge number of incorrect manners) -and- removing it doesn't disturb the ignition timing, as that's all done inside the distributor, instead of in the relationship of the distributor to the engine block.
So, I removed the four spark plug wires (after labeling them), removed the coil (it's part of the distributor assembly), removed the distributor cap, then removed the two bolts that hold the distributor to the front of the block. I had to pry on it with a screwdriver a bit to loosen it, but it came right out. The only trick to putting it back in is to have observed which direction the rotor was approximately pointing when you removed it, and put the rotor back into that approximate position when you reinstall it.
The inside of the distributor was pretty nasty. Lots of sticky white aluminum oxide from the corrosion of the interior of the distributor housing. The points looked to be very narrowly gapped, and the contact surfaces were sickly green.
I'll be cleaning this up tomorrow evening, as best as can be done without completely disassembling it. A full rebuild would be the best course, but that's not in the offing right now. Simply running some crocus cloth over the points and setting the gap might get the tractor running, but the distributor is not the place for creeping corrosion, this is a problem that will come back and bite me in the future if I don't put some time into taking care of it now.
Jan 22 Well, I lied when I said that I wasn't going to rebuild the distributor:
Once I had the points out, it only took a couple of more screws and a snap ring and the whole assembly was apart and ready for proper cleaning. The points themselves looked like they had been ceramic coated, there was a thick, hard, and very smooth coating of something covering the contact areas and sides. This was the reason that the point gap looked to be so small. A few minutes with an Xacto knife and it was all chipped away. The empty housing was scrubbed and rinsed in parts degreaser solvent, then hosed off, blown off with compressed air, then left on top of the wood stove to bake for a few minutes.
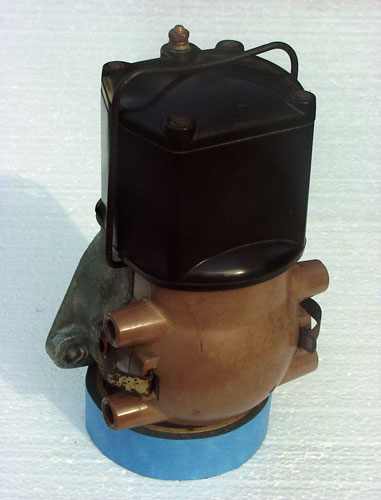
I oiled the centrifugal advance mechanism and checked and oiled the bearing bushings in the housing. Everything seemed to be in good shape, so I reassembled the distributor, installed the points and gapped them to .015 after running some crocus cloth between the contact areas to burnish them up. Cleaned the cap and the ignition coil, (the big black box on top of the distributor in the photo above).
The one thing that did still need some work was the spark plug wiring. When I removed the distributor cap, I noticed that the #1 plug wire had lost it's brass connector at the end. The ignition wiring on this tractor is classic old-school, copper wire. In the olden days, you went out and bought a generic set of wires that only had the spark plug ends installed. You cut the wires to length and installed these crimp-on brass connectors at the distributor end. Well, whoever put these ends on had stripped the wire back, run it through one of the triangular holes in the end connectors, and pushed them home into the distributor. I guess that worked well enough, but the #1 plug wire had let go, so I decided to re-make all four wire ends by cutting the connectors off, stripping back the insulation to expose new wire, then soldered the connectors in place neatly. Normally, the connectors hang on with little grippy teeth that pierce the wire insulation. Soldered works better. No more lost wire ends for me.
After that, there wasn't much else left to do, so I cobbled together a temporary ballast resistor for the ignition coil primary so it could run on 12 volts.
The previous owner told me that the gas tank leaked, and since it was dry now for a few years, I decided to leave it that way and build a temporary fuel feed for the carburetor using a hose barb that fit the carb and a section of urethane fuel line fed by a one-gallon gas container filled with (gasp) "clear" premium fuel (i.e., no evil ethanol added). I use this gas in my chain saw, and it was the easiest fuel to access around the place. In order to get anything else, I'd have had to pump some out of my pickup, which was just one more thing I didn't want to have to do.
After a flow of fuel was fed to the carb, there really wasn't anything else to do, so I connected the ignition primary to the battery, pulled out the choke knob, set the throttle lever to the middle, and sparked the loose wire that energizes the starter solenoid to the battery. It cranked over about twice and then started up like it had been shut off for only a day! I had to fiddle with the choke a bit to find a setting the engine liked, but it ran fine. It sounded awful, something like a tractor with a bad muffler... oh wait, that's right! There was also a lot of blue smoke, the result of the Marvel Mystery Oil I had dumped down the cylinders last week.
I checked the radiator, and there was a small amount of water splashing around, but since I hadn't seen any coolant in the top of the radiator when the engine was off, I decided to cut the ignition and add some water, just to be safe. About two quarts and it was showing above the radiator core tubes, that's enough.
OK, now it runs, gotta do something else. I just had to drive it somewhere, if only to the shed which I had prepared for it, as the weather is supposed to change from clear and cold to rain tonight. But there's the problem of where to sit... How did I solve that one?
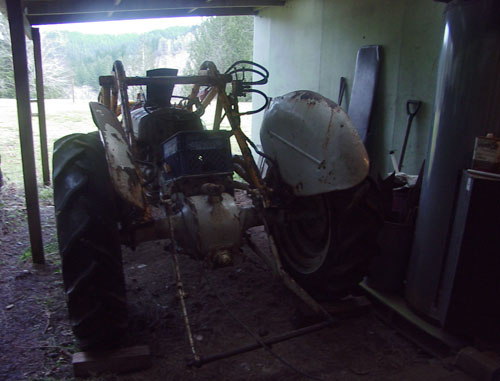
The universal building block, a plastic milk crate! With this temporary seat in place, I drove around the yard a bit, trying out each gear and testing the brakes. A bit of disappointment there, the right brake sort-of works, it will skid the tire if you get up and really stand on it, but the left brake doesn't do anything at all. This is unfortunate, because it's the one that's tied in with the clutch pedal and would normally provide most of the braking when driving the tractor. Eventually, I'll have to take the axles out and look at the brakes on both sides, I've had too much experience with my ElecTrak and no brakes to want to go through that anymore.
By the time I drove it into the shed, the motor was warmed up and not running all that well. It sounded like it was running too rich, bogging. I'll have to take the carburetor off and disassemble it and see how it looks. Could be that the float is set wrong
Now I have to start spending money on this thing. New muffler and a new fuel tank to start off, and I'm cruising Craigslist for some new/used front wheels and tires.
Can't wait to get the rusted yellow loader off of it, either.
Original material ©1996-2026 Mr. Sharkey | All rights reserved