
Epilogue
Epilogue
Or...How I put the EV back together
In the ensuing few days, I began the process of repairing the Rabbit. The damage to the controller was limited to the PWM module and the step-start contactor.
The PWM module had sustained heavy burning on the printed circuit card. The positions which were previously occupied by ½ watt resistors were now blackened, carbonized craters. I disassembled the unit and carefully checked all of the components for failure. Fortunately, I had made a circuit diagram previously, so I had part values for the burned resistors. The PC board had to be scraped clean of the conductive carbon, and I coated the raw fiberglass of the board with epoxy to seal the area. A new pass transistor was also installed, and the operation checked.
 The start contactor was a greater challenge. It had been scorched once before, and very little of the original silver contact blocks was left. The precious metal had been vaporized in the fire, and I attempted to file new contact area onto the armatures.
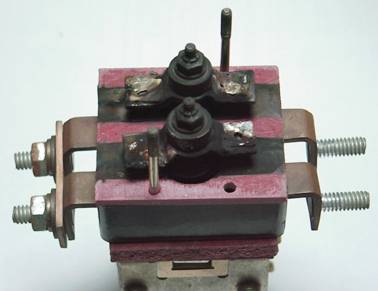
Here the top set of stationary contacts is removed, and what is supposed to be showing is bright, shiny silver contacts. In fact, there are supposed to be no areas on the top of the device that are black in color. About the only good thing about this part of the contactor is that it carries very little current, and for a very short time. These contacts are responsible for causing the electric motor to spin down very quickly when it is shut off. As such, only about 60 amps peak is carried, and this dies away as the motor spins down over about 2 seconds. If these contacts fail, the result is that the motor takes about 15 seconds to spin down when it is shut off, which is noticeable, because the car will lurch forward when the clutch is released in gear after parking. The main contacts which carry the motor start-up current were given a smoke-job, but weren't damaged in the fire.
At any rate, I filed the contacts back into as good a shape as I could make them, cleaned all of the carbon and soot off of the insulators (red areas) and reassembled it. For good measure, I installed a 60 ampere Class T fuse, which will protect the contacts in case I ever forget and release the clutch with the motor off while being pushed.
With these repairs, the EV was drivable again. The Pusher needed some work as well. I removed the mostly melted servo, and inspected it for additional damage, and took some part numbers off of the power transistors so that I could get replacements. Considering how much heat they had taken, it was surprising that they still functioned at all, however poorly the operation had seemed on the trip. The new transistors were mounted on the master controller for the trailer, along with the servo driver board. Now the power handling components would have a proper heat sink and be in a semi-controlled environment where excess heat buildup wouldn't affect their operation.
In the end, I designed (but have not yet built) modifications to the controller on the EV which will prevent the recurrence of the failure I experienced outside of Mitchell. I have plans to have a "kill switch" on the EV, so that I don't have to touch the ignition switch to shut down the electric drive while the Pusher is active, and an "auto-start" circuit that will automatically restart the electric motor as soon as I press the clutch pedal when the car is coasting under Pusher power. This way two problems that I identified on the SolWest trip will be rectified. No more worries about forgetting to turn the ignition key (and steering wheel lock) back to the "on" position after shutting down the electric drive, and a fail-safe auto-start to prevent me from ever trying to go into regen mode with a deactivated (and unenabled) electric drive motor.
So, That's All Folks...
THE END
(of SolWest 2001, but I'll be back in 2002)
Original material ©1996-2026 Mr. Sharkey | All rights reserved